Understanding–“AZURE”–Part V-SQL DB
Welcome @ Azure University….
Hi Friends, Today I will talk about PaaS or Platform as a service . And I will show you how you can use Azure SQL Platform. Microsoft called it as Database-as-a-Service . To do this practical you need an active Azure subscription and a computer with SQL Server Management Studio installed on it. Here I am using a VM that I got from Microsoft for practice where SQL server management studio is already installed.
Before move to practical let me tell you few theoretical facts about Azure SQL PaaS.
Azure SQL Database and SQL Server in an IaaS virtual machine both are completely different . In “Azure SQL Database (PaaS)” – Maintainence of SQL database server will be done by Microsoft but in “SQL Server in Azure VM (IaaS)” – You will be completely responsible for maintaining everything , means you will create your VM and then you will download the SQL server and install on that and insert the key to activate that and you can use that or you can use SQL image from gallery .
Tradition method of using SQL Database : Install compatible OS in a computer + Install SQL server engine + SQL server management studio .
In Azure : Open Azure console and click on SQL database and create database . Install and Open SQL management studio from any computer and connect to that SQL server and work with that.
Follow the following steps to create a database in Azure SQL Platform .
- Open you Azure console in your browser. Click on NEW and search for SQL Database.


- After clicking on the SQL database you will get option to enter your database name and other details.

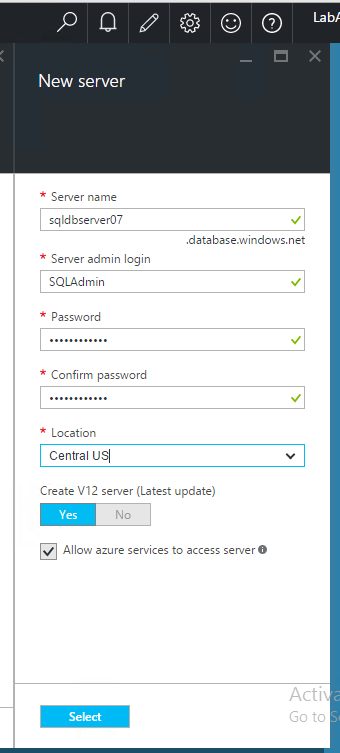
- Enter all details and then click on “SERVER” to select/create server for SQL Database. Click on “Create a new server” and enter all details and create a new server where the SQL database will be hold and click on select.

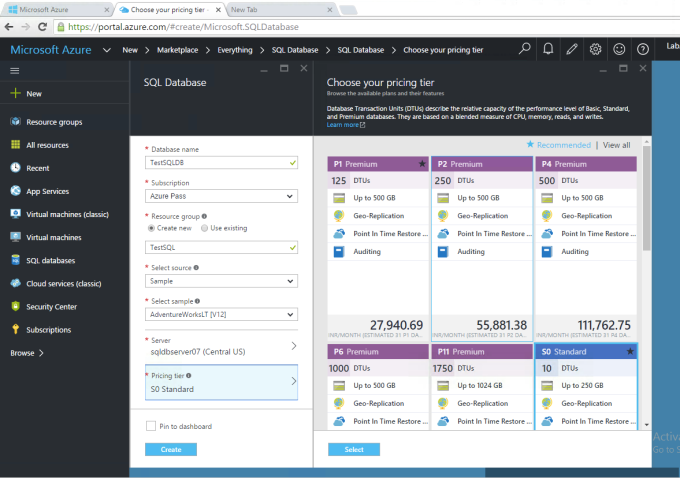
- After creating the SQL server click on Create. If you click on “Pricing Tier” you will get option to select Your Pricing Tier.
- And that’s all. You are done !! If you follow this few step you can create your database in Azure SQL which is Highly Available, locally redundant and you can access that DB from and computer through SQL management studio.
- Here is your Database (TestSQLDB).
- Now let’s move to desktop where we have installed SQL management studio.

- Open SQL management studio.

- Here you have to enter the server name . To get the server name move to Azure portal and click on your database.
 Then click on server server name to copy that .
- Copy that server name and paste to SQL management studio . Select authentication process : SQL Server Authentication . Provide SQL user details .
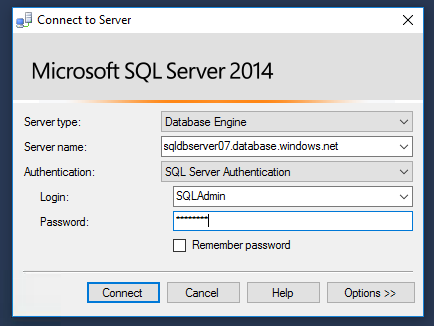 And click on Connect .
 - You will get an authentication error . Azure SQL firewall will block you to access that server . To allow that you have to allow your computer IP address from Azure SQL Firewall settings .
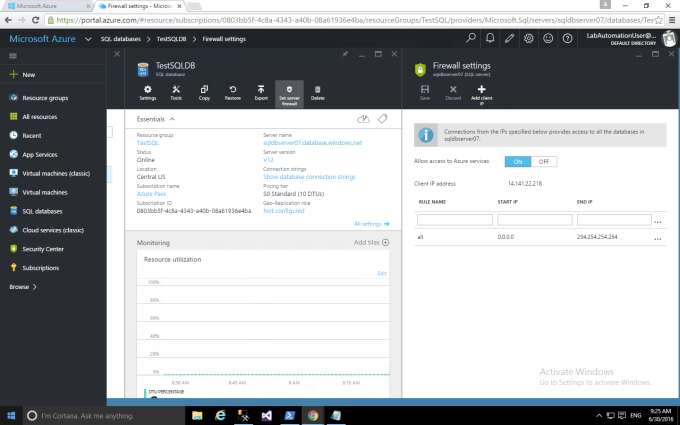 Here I allow all computer by defining IP Address : 0.0.0.0 and Subnet Mask : 254.254.254.254 .
 - Now try to connect .
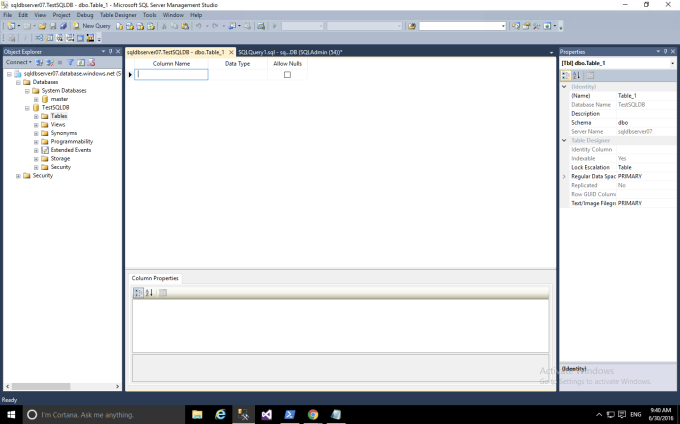
- I believe you can connect to your database . Now start playing with your DB.

Thanks for reading my blog. Hope you like it . If you face any problem write me @ subhendu2016@hotmail.com . Suggestions are always welcome . Let me know how I can make my blog more better .